Monday, March 14, 2011

Entry 26: Axle Swap

Eliminated all the vibration from the driveline by replacing the axle bearings and the u-jonts, however when re-installing the driveshaft on the lift the pinion flange had endplay in it (could move pinion flange around by hand between 1/8" and 1/16"). Not a significant amount but it was definitely noticeable. Took the 86 out for a drive and immediately felt/heard clunking from the axle whenever I let off the accelerator and over 45 mph. With all the vibration before I didn't notice the thunking. Something is clearly not right, after investigating learned I needed either a rebuild or a fresh axle. Could not re-use the gears because the ring wear pattern is now uneven from the floating pinon and would generate a whine, picked up a used 8.8 axle for $225. 
 
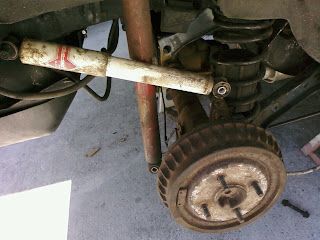
Spent 8 hours over two days this weekend pulling out the old axle, stripping it and installing the replacement one. Found it easier to unbolt the lower control arms and upper control arms at the axle, which made the swap fairly straightforward. Swapped the following over: parking brake cables, differential cover with the fill plug brazed in, full drum brake assembly with new master wheel cylinders, and brake rotors. While I had the axle out I replaced the worn shocks with a new set of Monroe Sensatrac's.


Swapping Axles
Old 8.8
 

Saturday, February 26, 2011

Entry 25: New U Joints

Pulled off the driveshaft in search of the continuing vibration, after swapping out the axle bearings it is significantly reduced but still present. Stopped at NAPA and picked up 2 heavy duty Precision 280 U-Joints to install. Pinion flange requires a 12 point 12 mm wrench to remove the four driveshaft bolts. Used the "big socket, little socket" trick to remove the caps and a bench vise to press the new ones in. Re-installed the driveshaft (don't forget the loctite on the flange bolts) and fired it up. Significant improvement in performance and reduction in vibration.

Tuesday, February 22, 2011

Entry 24: Axle Bearings

I had forgotten how nothing stinks like gear oil!!!

Took the 86 out for its first drive last week since its "rebirth" and heard a disturbing rumbling noise from the rear. The faster I went the worse it got. When took it up to 50 and put it in nuetral it made no difference, the sound remained. My thoughts were, "all that work and its still not right."

Pulled the tires off and was able to move the axle shafts around, way too much endplay. Very noticeable. Assumed it was the bearings so I put it up on the jack stands, opened the pumpkin, dropped the crosspiece and C Clips and pulled the axles out.

As suspected the outer axle bearings were shot and grooved/scored the axle shafts to the point that I could feel the ridge with my nail. Had read somewhere online axle savers were available to use so purchased a pair of #RP5707's at Advance. Its a cool part, combines the axle seal and the bearing into one unit you just press in and it pushes out where the bearings contact the axle shaft.
 
Rented an axle bearing puller from Advance and used it to yank out the bearings, took all of 5 minutes with the right tools. Can't imagine trying to break those out without it, what a nightmare it must be.

Used a bearings race (disc shaped tool of some sort at the shop) and brass hammer to press the bearings in and loaded everything back up. The passenger side was a bit snug at the outer axle seal causing the axle shaft to need a bit of help to go in but it all went back together. Likely over pressed the bearing a touch but it'll be fine for a weekend driver.
 .
Took it out last night for a long drive to get all the fluids moving around, the car probably hasn't been driven in at least a year so it took a few minutes to get up to temp but everything went well.

Sunday, January 23, 2011

Entry 22: Updated Pictures

With all significant repairs are completed I pulled the 86 out of my Dad's shop and washed it, what a difference soap and water makes.....

All the new weatherstripping held up well and the interior is quite comfortable. Need to get a few floormats.

Noticed the paint is a metallic grey in the sunlight, have to wet sand with 1500 grit and buff/polish to really bring out the finish. Couldn't believe how well it ran and looked. When I was washing it I could feel on the sponge the surface is slightly rough and needs a good cut and polish.

Video clip (Quicktime):


(The red item on the drivers seat is plastic I use to protect the interior when I am working on it)

Pictures:


Entry 21: Exhaust Manifolds

I have a set of set of 1½" MAC Performance Unequal length shortie headers left over from another project, all they needed was to be cleaned up and painted. Used a wire wheel to strip off all the old material and coated with two layers of 1200 degree satin paint. The heat will cure them yielding a nice Satin Black color. These always outflow the stockers so it should yield a nice sounding exhaust.

Before:
 

After:


Monday, January 17, 2011

Entry 19: Rocker Panel Repair

After searching around for the correct color to match the current finish, finally had a chance to paint the Rocker Panel. When the passenger side floor pan and lower toeboard rotted through, it also obliterated the rocker panel, so when I replaced the floor pans last year I also repaired the rocker.

Back in September I had to create the metal patch for the area. Could not find any repro patches so I had to fabricate a piece up with the MIG and scraps from the pans. Then used Rage Gold filler, block sanded, repeated, skimmed with lightweight filler and final sanded. Gray filler primer followed by Metallic Gunmetal Grey paint. The entire car needs to be sanded with 1500 grit sandpaper and polished out, which will include the final portion of this repair. Plan to re-spray the entire car in the near future, but would ike to drive it for while before taking it apart again!.


July 2010


September 2010


<-Blocked
Primed ->
December 2010


Wednesday, December 29, 2010

Entry 18: Making Progress....

Installed the door scuff plates, mounted the tach, swapped in the new battery tray, started cleaning the interior and blocked off the dash bezel where the heater control goes. Later I'll add a gauge there but for now it works. Still need to wire up the tach, mounted it up high to crosspiece to avoid destroying the dashpad or any of the plastic pillars. 79-86 parts are getting hard to come by and are not being reproduced in any mass scale like the 65-73's. 


Spread some filler on the rocker panel where I welded the exterior patch piece in. Tomorrow I'll sand it down and prime/paint it.


Code Reader:
Purchased a code reader to determine if there were any further repairs to be made. Equus 3145 is a digital readout model I purchased for $30 shipped to my door. Looks like this......

.....and plugs into the OBD port under the hood:


When I dumped the KOEO codes received the following:


Stored:
Code 81 - Smog Equipment Delete
Code 82 - Smog Equipment Delete
Code 85 - Smog Equipment Delete


Continuous:

Code 18 - Ignition System Fault Thanks to NikwoaC at stangnet for figuring this out...

1. Faulty distributor, coil, TFI causing car to run poorly or not at all

2. Wiring issue surrounding the ECM Return Signal from TFI Connector. Car runs. Pin "5" on the TFI connector splits into three paths to trace back: Tach, Negative side of coil and ECM Pin 4 IDM (Ignition Diagnostic Module) which has an inline resistor of ~22,000 ohms. Check the resistor first if the car is running normally and throwing a code 18.

Verify resistor is bad by using DMM to measure resistance from in to out with car OFF. If out of range, or a huge number, find a 22K ohm 2W resisitor and cut out and splice in the new resistor. 


Tuesday, December 28, 2010

Entry 17: More Parts

Now that I have gotten the larger items accomplished, looking forward to getting some new parts to put on and finish it up:

1. Subframe Connectors: Summit Racing® Weld-On Subframe Connectors SUM 790100. Ones on the car are rusted through and need replacement.

2. Battery Tray BT11: CJ Pony Parts OEM style reproduction battery tray made from original Ford Tooling for a perfect fit. Constructed from heavy-duty black plastic. Original is broken and is not holding the battery properly.

3. Dome Light: Read somewhere 92-00 domelights will fit into the 79-93 fox platform with a slight bit of modification. We'll see what happens......

Sunday, December 26, 2010

Entry 16: Weather Stripping, Dew Wipes and Rear Hatch

When I acquired the car the rear seats had been removed and discarded, given there were only lapbelts for the rear passengers in 86' plus the 30 lbs+ weight savings I decided to delete the rear seat. Kits on the internet are $300+, with the roll of carpet from when I purchased the car I decided to make a run at it myself. Using a cardboard template I cut a piece of aluminum to go over the spare tire well and glued the carpeting to it. Fit really nicely and the carpet flows over the rear seat pan well into the passenger area.Used an extra piece of interior trim moulding spray painted black to cover the seam/transition to the carpeting in the front cabin. Actually turned out nicer than I expected, when I get a chance I'll upgrade to a nice polished aluminum piece.

Next up was weather stripping, CJ Pony Parts sells a WSKIT32 kit for $47 which includes both door seals and a hatch seal. They were easy enough to install with a heat gun, rubber mallet and a screwdriver. Just loosen the interior trim pieces, pull out the old and in with the new. The old hatch weather stripping was so flat following installation the striker had to be adjusted upwards 1/4"+ so the hatch would latch. The doors sound solid with new rubber.

Beltline weatherstripping (also known as exterior dew wipes) are an interesting installation, for what they cost be sure to do it correctly. The part has the rubber portion along with the metal piece to hold it in place. You need to remove the knob from the mirror and the metal trim piece, exposing two screws which hold the mirror to the door. In order to replace the wipes the mirror has to be removed, the old piece taken out and then a new piece installed and the mirror re-attached. The only tricky part is to ensure the clips are to the inside of the pinch seam or it will not attach properly. This is a really nice part and went on easily, plus it really cleans up the door line. WSBL17P


Scuff plates are always fun, hosed the old ones down with brake cleaner and sprayed with Trim Paint. I'll install tomorrow after they have a chance to dry.

Saturday, December 11, 2010

Entry 15: Engine and Brakes

Fuel System
After finished installing the interior, I went to start the car and it would not start. Great. Engine turned over but would not catch.

Checklist for common failures:
1. Tripped inertia switch – press reset button
2. Fuel Pump power relay – located under the driver’s seat
3. Clogged fuel filter
4. Failed Fuel Pump
5. Blown fuse link in wiring harness.
6. Fuel pressure regulator failed.


Started by resetting the inertia switch, not the culprit. Next I checked the relay socket with the old relay installed. 12V on the yellow, but no voltage on the pink wire (out) with key on. I jumped the yellow to the pink on the back of the relay housing and the fuel pump whirred on, confirming a faulty relay. Went down to the Ford dealership and for the sum of $21.53 purchased a genuine Motorcraft relay which should last another 24 years. Got home and it fired right up!

Testing the relay socket (detailed):
1. Look for 12V on the Yellow wire, always hot
2. Turn on Key. Look for 12V on Light Pink wire (out to fuel pump, tests fuel pump) and on the Red/Black wire (switched accessory power, tests intertia switch) Inertia switch should have power on both sides. The Tan wire/Light Green stripe is a switched Ground to the ECM.
3. Drop the fuel tank, look for 12V on Pink wire with key in run and test to ground/black wire and should have <10 ohms.

Cooling System
Had a chance to drain out the old coolant (which was water), replace the upper and lower radiator hoses, and install a horseshoe at the heater core bypass. Taking a length of heater hose and forming a "U" will cause the hose to kink and restrict coolant flow. This is what may have been causing the overheating issue the PO described because right after the heater hose output is the temp sensor. Instead went down to NAPA and part # 11607 was pre formed and fit perfectly. Refilled the system with 50/50 Peak One and idled it up nicely.


Chasing a wandering idle:
Using the surging idle checklist over at stangnet.com, the most common source of wandering idle is a bad IAC, or idle air bypass valve. A dirty IAB will cause stalling when the engine is cold. First step is to remove the IAC/IAB, and clean with a toothbrush and throtlle body cleaner to remove the carbon buildup. Unfortunately, the original Ford part was beyond repair and this did not resolve it. Bought a replacement (Standard Motor Products# AC21) off of Rockauto for $41 on sale and bolted it on today. We'll see how it runs now, if its not this the next check is vaccuum leaks.

UPDATE: Replaced the IAC and it idles perfectly. Vast improvement, no more wandering idle.

If this had not resolved it, the next step would have been to check the TPS (Throttle Position Sensor) which works like a rheostat or variable resistor. A surging or hanging idle in particular is a symptom of a bad TPS. Check the voltage on the TPS, at idle it should be inititally set between 0.6 and 1.0 when the engine is warmed up. WOT should be around 4.25 (check when car is off). Don't forget to reset the computer afterwards so it re-learns the new setting. It will zero out everytime the car is started.

Still have to check the vacuum tree and connections, which can also cause a wandering idle. Starting fluid or oil can be sprayed to easily find a leak, the engine will surge when it is sprayed over the leak. Replace thge PCV valve if needed.

Dirty 10 pin connectors can also be a cause of idling, especially 1,2 and 5.

Poor grounds can also generate idle issues. Verify the main power ground cable from the battery is placed directly against the block and not on top of the bracket. Check to make sure the secondary ground strap is present from the cylinder head to firewall. If you are running a 3G alt it needs to be 4 gauge. Ensure the CPU ground wire under the hood is grounded, a black cylinder 2.5" long x 1.0" diameter with a black wire/light green stripe.
System voltage at idle should be 13.8 to 14.2 Volts.

Timing should be at a minimum of 10 and a nax of 14 (ex- boost or nitrous)

Spent last weekend pulling the rear drums apart and realized the parking brake lever was missing from the passenger side and likely causing the brakes to drag and the parking brakes to not function. Bought a set of rear drums complete with backing plates from a guy here locally for $10, scavenged the parts I needed and went to work, Replaced the parking brake cables, the wheel cylinders, brake pads, springs and all hardware. Bolted it all up and started the fronts.

After pulling the 16" ponies off the front I discovered good news and bad news. Bad news was the parts I ordered were not going to fit, having already ordered some replacement parts expecting the stock setup. Good news was the front spindles, rotors and calipers had already been upgraded to the heavier duty 87-93 ones. . This upgrade can run anywhere from $200 to $500 so I am not concerned with the parts I couldn't use.

Learned two easy ways to identify whether the 4 eye had been upgraded to 87-93's:
1. Banjo Bolt connections (79-86 hoses screwed directly into the caliper)
2. Metal Dust Shields (79-86 had plastic)


Saturday, November 13, 2010

Entry 13: Finishing Up The Interior

Finished installing the foil faced cotton batting on the front of the cabin and on the firewall, everything is sealed up to resist heat and noise.


Next is the carpet, you can really see the difference a new carpet makes on an interior. Also installed the doorpanels and armrests I acquired through http://vb.foureyedpride.com/ .


 Dash pad looks nice, I just need  to clean it up now that it is installed.


Still have some wiring to clean up and final carpet fitment and installation, but everything is starting to come together.